Kubernetes這個名詞,在過去幾年橫掃了IT界,可以說是繼虛擬化之後,另外一個指標性的技術,它在雲原生的世界中大放異彩,幾乎快到了無所不能的境界,與此同時越來越多的軟/硬體廠商,也相繼推出了各式各樣的Kubernetes整合方案,讓它能夠持續、不間斷地繼續發燒!
從 VM > Contaner > CI/CD > Service Mesh > GitOps > MultiCloud
像我們這種以網路起家的IT人員,跟三五好友聚會聊天時,總不禁會感嘆的說,現在不會寫一點程式,搞一點自動化部署、開發,就好像跟IT世界脫節一般。
敏捷這兩字,似乎只要跟上了,就會發大財一般,其實不然,因為大多數的企業主,還是採用較為保守的方式來面對新技術的發展,也是因為這樣的一步一腳印,我們這些老SE,才能夠繼續在這邊跟各位聊聊技術。
轉變,從來都不是一觸即成的,唯有一步一腳印,才能夠造就我們。
Anthos Bare Metal,就是一個這樣子的產品,它可以讓企業可以逐步的建構屬於自己的雲原生落地環境,而不需要急急躁躁的一窩蜂上雲,因此當筆者聽到Google發佈了這個產品時,心中非常的雀躍,因為終於可以在地端環境中,好好的玩一下基於Google進行優化的Kuberntes平台,讓我們跟著Google的腳步一起來玩玩吧! 相信大多數接觸Kubernetes平台的玩家們,應該都是從開源社群開始的吧!在Kubernetes環境建置的過程中,你[絕對]會遇到非常,不!應該說是超級多的安裝問題、錯誤訊息,這個時候就是考驗工程師魂的時候啦!只要爬的文夠多,再加上貢獻的Lab時數足夠,自然就能夠一一解決問題,將平台建構起來,進而享受Kubernetes帶來的極速快感!
沒錯!只需要一行指令,你就可以快速的把workpress的blog網站建構完畢,並且讓你的網站具備自動修復、自動資源擴展的神奇能力!
然而現實是殘酷的,大多數的企業IT人員,其實並不具備這樣的能力,因為在過往的科技培訓,都是以網路、Windows系統為主,鮮少有MIS會去主動接觸難搞的Linux系統,也因為如此,在企業踏入雲原生的領域前,可能要先好好惡補一下才行。
先來做個小測驗,如果以下幾個新興技術,您都有聽過、玩過,那麼恭喜你,是時候可以開來玩玩Kubernetes了!
- Linux作業系統(Ubuntu/ CentOS)
- 虛擬化平台(VMware/ HyperV)
- 容器化(Container)
- 代理/負載平衡器(Proxy / Load Balancer)
- 程式碼編輯器(Virtaul Studio Code)
- 版本控制(GIT)
假設有一半以上都沒聽過?那也沒關係,因為我們接下來會告訴您,如何透過Anthos Bare Metal,來協助您建置企業級別的Kuberntes環境,透過Google提供的bmctl管理工具,幫助我們完成自動化的部署。
話不多說!那我們就先從系統架構說明開始吧!
一般情況下,如果是標準的營運級Kubernetes cluster環境,我們會建議至少要有3台以上的master以及至少5台以上的worker,來提供workload所需要的系統資源,當然如果您的環境是測試環境,你也可以設置1台master + 1台worker這樣的迷你cluster環境來進行測試。
硬體資源需求:
Anthos Bare Metal 是有最低的系統資源要求的,因此在準備node環境的時候,要稍微留意一下,不要低於最低需求唷!另外針對硬碟類型的部分,您可以依據您的workload特性,自由選擇HDD or SSD(IOPS較高)。

作業系統資源需求:
Anthos Bare Metal目前僅支援以下幾種作業系統、版本,選擇的時候要稍微留意一下。
- CentOS 8.1
- CentOS 8.2
- CentOS 8.3
- CentOS 8.4
- RHEL 8.1
- RHEL 8.2
- RHEL 8.3
- RHEL 8.4
- Ubuntu 18.04
- Ubuntu 20.04
軟體調整需求:
針對不同的作業系統,會有各的軟體調整需求,在系統環境安裝完畢後,也要稍微留意一下,搭配進行調整
CentOS
- 將SELinux設置為permissive
- 關閉firewalld
- 安裝Docker 19.03以上的版本
- NTP更新
RHEL
- 註冊更新
- 將SELinux設置為permissive
- 關閉firewalld
- 安裝Docker 19.03以上的版本
- NTP更新
Ubuntu
- 關閉AppArmor
- 關閉ufw
- 安裝Docker 19.03以上的版本
- NTP更新
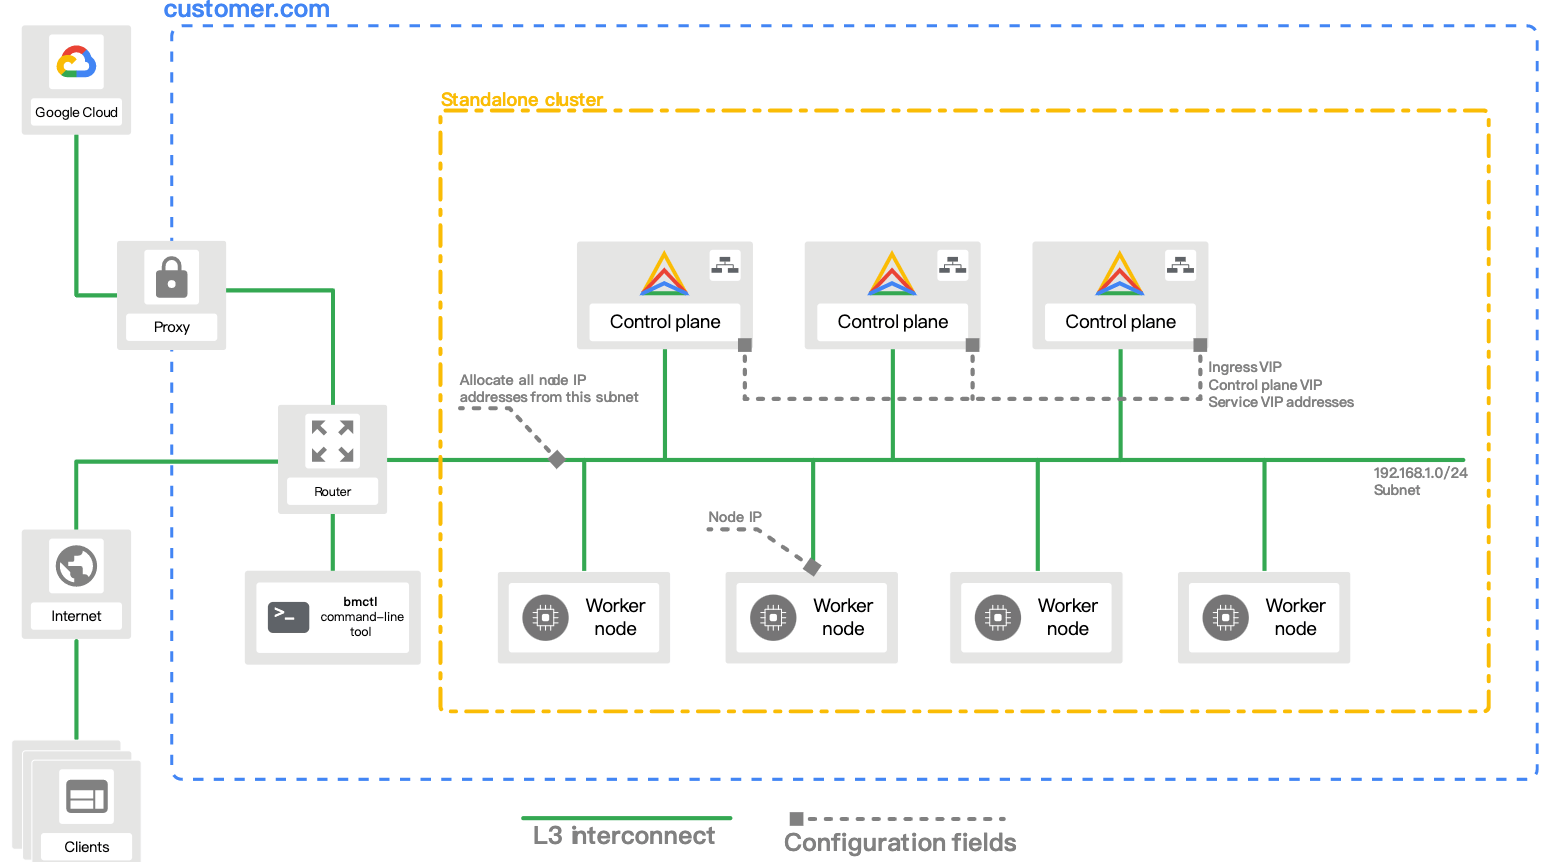
Networking資源需求:
Anthos bare metal的網路架構非常的簡單,您只需要一個subnet,就可以同時提供external L4 load balancing 還有master/worker的nodes網路存取,當然在許多的企業環境中,會希望拆分服務跟主機的網路區段,這部分當然也不是問題,您只需要在前端部署一台firewall,就可以輕鬆搞定囉。
LB資源需求:
AnthoAnthos bare metal本身內建MetalLB,在佈建的過程中,就會自動完成相關的安裝設置了,不像其他開源版本的K8S Cluster,需要自行安裝才能提供L4的load balancing流量轉送。
GCP平台相關設置需求:
在正式透過bmctl指令進行環境部署前,會需要預先將Anthos相關的API進行啟用,並產生service account key的token,最後再將相關路徑寫入到config中,以利部署時讀取相應的權限。
部署參考範例:https://cloud.google.com/anthos/clusters/docs/bare-metal/1.8/installing/configure-sa
Note: 如果覺得很麻煩,你也可以透過 bmctl自動幫你完成上述的作業。
Anthos Cluster部署模式:
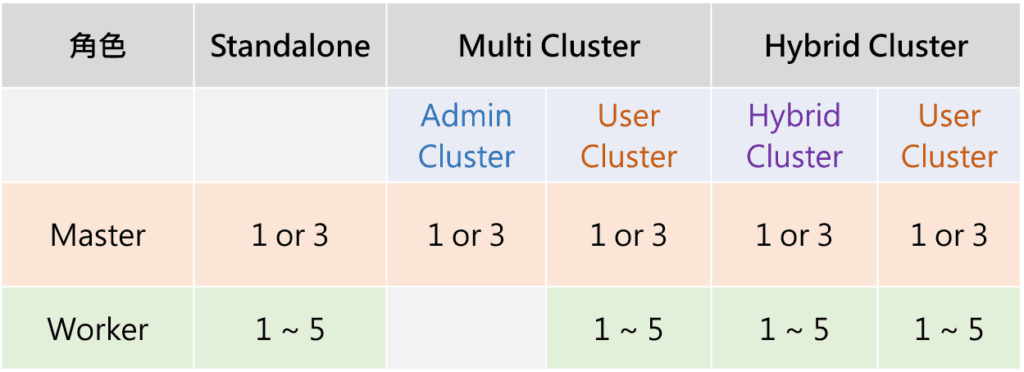
Anthos cluster支援三種模式(Standalone/MultiCluster/HybridCluster),大多情況下,我們會選擇Standalone模式進行部署,除非您的環境中會需要部署多個User Cluster,才需要選擇Multi Cluster or Hybrid Cluster,來進行User Cluster的集中管理、部署,Hybrid Cluster您則可視為Multi Cluster的變形版本,它可以部署共用的workload資源在Hybrid Cluster的worker中,通常會是監控、分析相關的資源。
管理工作站需求:
因為是透過bmctl的指令集來進行自動化部屬,因此我們需要額外準備一台Linux主機(建議用Ubuntu即可),然後進行一些額外的準備:
- 透過ssh-keygen產生公/私金鑰,並將公鑰資訊寫入到所有的master/worker主機的.ssh/authorized_keys中
2. 安裝gcloud sdk指令集
https://cloud.google.com/sdk/docs/install
3. 安裝最新版本的bmctl指令集
https://cloud.google.com/anthos/clusters/docs/bare-metal/1.8/downloads
呼!費了一些勁,終於把基本環境的資源準備好了,接下來就是重頭戲了,要來開始部署cluster囉!
第一步:在管理工作佔中,取得登入GCP專案的應用程式權限(請先確認您登入的帳戶是否有專案OWNER的權限)
| gcloud auth application-default login |
第二步:彙整配置表,以利後續進行template config修改
| 配置項目 | 設置 | 說明 |
|---|---|---|
| sshPrivateKeyPath | ~/.ssh/id_rsa | 讓管理工作站能夠藉由此私鑰,直接登入Nodes進行環境、設置的自動化部屬 |
| Cluster Type | Standalone | |
| Master Node IP | 10.200.0.4 | Master Nodes的IP,如果有多台,請自行加入 |
| Pod IP-range | 192.168.0.0/16 | kubernetes pod的IP-range,建議不要跟目前運行網路中的subnet重疊 |
| Service IP-range | 10.96.0.0/20 | kubernetes service的IP-range,建議不要跟目前運行網路中的subnet重疊 |
| controlPlaneVIP | 10.200.0.71 | kubernetes的api-server IP,後續會透過kubectl訪問此位址進行管理 |
| ingressVIP | 10.0.200.72 | kubernetes的default ingress IP,後續若配置ingress,可透過此IP做L7的LB訪問、轉發 |
| MetalLB IP-pool | 10.200.0.72-10.200.0.90 | kubernetes的external L4 LB IP配發位址,後續可透過kubectl expose動態要求一個IP,進行L4的LB訪問、轉發 |
| GCP Logging & Monitoting | location: asia-east1 enableApplication: true | 啟用application logging 機制,將log及metrics拋到GCP中進行存儲、分析 |
| Worker Nodes IP | 10.200.0.5 10.200.0.6 | Worker Nodes的IP,如果有多台,請自行加入 |
第三步:透過bmctl產生出cluster template config,同時透過第一步獲得的GCP專案權限自動的啟用API及創建servcice account & key
| export CLOUD_PROJECT_ID=$(gcloud config get-value project) bmctl create config -c STD-C01 –enable-apis \ –create-service-accounts –project-id=$CLOUD_PROJECT_ID |
第四步:修改cluster template config
| gcrKeyPath: /bmctl/bmctl-workspace/.sa-keys/my-gcp-project-anthos-baremetal-gcr.json sshPrivateKeyPath: ~/.ssh/id_rsa gkeConnectAgentServiceAccountKeyPath: /bmctl/bmctl-workspace/.sa-keys/my-gcp-project-anthos-baremetal-connect.json gkeConnectRegisterServiceAccountKeyPath: /bmctl/bmctl-workspace/.sa-keys/my-gcp-project-anthos-baremetal-register.json cloudOperationsServiceAccountKeyPath: /bmctl/bmctl-workspace/.sa-keys/my-gcp-project-anthos-baremetal-cloud-ops.json apiVersion: v1 kind: Namespace metadata: name: cluster-STD-C01 apiVersion: baremetal.cluster.gke.io/v1 kind: Cluster metadata: name: STD-C01 namespace: cluster-STD-C01 spec: # Cluster type. This can be: # 1) admin: to create an admin cluster. This can later be used to create user clusters. # 2) user: to create a user cluster. Requires an existing admin cluster. # 3) hybrid: to create a hybrid cluster that runs admin cluster components and user workloads. # 4) standalone: to create a cluster that manages itself, runs user workloads, but does not manage other clusters. type: standalone # Anthos cluster version. anthosBareMetalVersion: 1.8.2 # GKE connect configuration gkeConnect: projectID: $GOOGLE_PROJECT_ID # Control plane configuration controlPlane: nodePoolSpec: nodes: # Control plane node pools. Typically, this is either a single machine # or 3 machines if using a high availability deployment. – address: 10.200.0.4 # Cluster networking configuration clusterNetwork: # Pods specify the IP ranges from which pod networks are allocated. pods: cidrBlocks: – 192.168.0.0/16 # Services specify the network ranges from which service virtual IPs are allocated. # This can be any RFC 1918 range that does not conflict with any other IP range # in the cluster and node pool resources. services: cidrBlocks: – 10.96.0.0/20 # Load balancer configuration loadBalancer: # Load balancer mode can be either ‘bundled’ or ‘manual’. # In ‘bundled’ mode a load balancer will be installed on load balancer nodes during cluster creation. # In ‘manual’ mode the cluster relies on a manually-configured external load balancer. mode: bundled # Load balancer port configuration ports: # Specifies the port the load balancer serves the Kubernetes control plane on. # In ‘manual’ mode the external load balancer must be listening on this port. controlPlaneLBPort: 443 # There are two load balancer virtual IP (VIP) addresses: one for the control plane # and one for the L7 Ingress service. The VIPs must be in the same subnet as the load balancer nodes. # These IP addresses do not correspond to physical network interfaces. vips: # ControlPlaneVIP specifies the VIP to connect to the Kubernetes API server. # This address must not be in the address pools below. controlPlaneVIP: 10.200.0.71 # IngressVIP specifies the VIP shared by all services for ingress traffic. # Allowed only in non-admin clusters. # This address must be in the address pools below. ingressVIP: 10.200.0.72 # AddressPools is a list of non-overlapping IP ranges for the data plane load balancer. # All addresses must be in the same subnet as the load balancer nodes. # Address pool configuration is only valid for ‘bundled’ LB mode in non-admin clusters. addressPools: – name: pool1 addresses: # Each address must be either in the CIDR form (1.2.3.0/24) # or range form (1.2.3.1-1.2.3.5). – 10.200.0.72-10.200.0.90 # A load balancer node pool can be configured to specify nodes used for load balancing. # These nodes are part of the Kubernetes cluster and run regular workloads as well as load balancers. # If the node pool config is absent then the control plane nodes are used. # Node pool configuration is only valid for ‘bundled’ LB mode. # nodePoolSpec: # nodes: # – address: # Proxy configuration # proxy: # url: http://[username:password@]domain # # A list of IPs, hostnames or domains that should not be proxied. # noProxy: # – 127.0.0.1 # – localhost # Logging and Monitoring clusterOperations: # Cloud project for logs and metrics. projectID: $GOOGLE_PROJECT_ID # Cloud location for logs and metrics. location: asia-east1 # Whether collection of application logs/metrics should be enabled (in addition to # collection of system logs/metrics which correspond to system components such as # Kubernetes control plane or cluster management agents). enableApplication: true # Storage configuration storage: # lvpNodeMounts specifies the config for local PersistentVolumes backed by mounted disks. # These disks need to be formatted and mounted by the user, which can be done before or after # cluster creation. lvpNodeMounts: # path specifies the host machine path where mounted disks will be discovered and a local PV # will be created for each mount. path: /mnt/localpv-disk # storageClassName specifies the StorageClass that PVs will be created with. The StorageClass # is created during cluster creation. storageClassName: local-disks # lvpShare specifies the config for local PersistentVolumes backed by subdirectories in a shared filesystem. # These subdirectories are automatically created during cluster creation. lvpShare: # path specifies the host machine path where subdirectories will be created on each host. A local PV # will be created for each subdirectory. path: /mnt/localpv-share # storageClassName specifies the StorageClass that PVs will be created with. The StorageClass # is created during cluster creation. storageClassName: local-shared # numPVUnderSharedPath specifies the number of subdirectories to create under path. numPVUnderSharedPath: 5 # NodeConfig specifies the configuration that applies to all nodes in the cluster. nodeConfig: # podDensity specifies the pod density configuration. podDensity: # maxPodsPerNode specifies at most how many pods can be run on a single node. maxPodsPerNode: 250 # containerRuntime specifies which container runtime to use for scheduling containers on nodes. # containerd and docker are supported. containerRuntime: containerd # KubeVirt configuration, uncomment this section if you want to install kubevirt to the cluster # kubevirt: # # if useEmulation is enabled, hardware accelerator (i.e relies on cpu feature like vmx or svm) # # will not be attempted. QEMU will be used for software emulation. # # useEmulation must be specified for KubeVirt installation # useEmulation: false # Authentication; uncomment this section if you wish to enable authentication to the cluster with OpenID Connect. # authentication: # oidc: # # issuerURL specifies the URL of your OpenID provider, such as “https://accounts.google.com”. The Kubernetes API # # server uses this URL to discover public keys for verifying tokens. Must use HTTPS. # issuerURL: # # clientID specifies the ID for the client application that makes authentication requests to the OpenID # # provider. # clientID: # # clientSecret specifies the secret for the client application. # clientSecret: # # kubectlRedirectURL specifies the redirect URL (required) for the gcloud CLI, such as # # “http://localhost:[PORT]/callback”. # kubectlRedirectURL: # # username specifies the JWT claim to use as the username. The default is “sub”, which is expected to be a # # unique identifier of the end user. # username: # # usernamePrefix specifies the prefix prepended to username claims to prevent clashes with existing names. # usernamePrefix: # # group specifies the JWT claim that the provider will use to return your security groups. # group: # # groupPrefix specifies the prefix prepended to group claims to prevent clashes with existing names. # groupPrefix: # # scopes specifies additional scopes to send to the OpenID provider as a comma-delimited list. # scopes: # # extraParams specifies additional key-value parameters to send to the OpenID provider as a comma-delimited # # list. # extraParams: # # proxy specifies the proxy server to use for the cluster to connect to your OIDC provider, if applicable. # # Example: https://user:password@10.10.10.10:8888. If left blank, this defaults to no proxy. # proxy: # # deployCloudConsoleProxy specifies whether to deploy a reverse proxy in the cluster to allow Google Cloud # # Console access to the on-premises OIDC provider for authenticating users. If your identity provider is not # # reachable over the public internet, and you wish to authenticate using Google Cloud Console, then this field # # must be set to true. If left blank, this field defaults to false. # deployCloudConsoleProxy: # # certificateAuthorityData specifies a Base64 PEM-encoded certificate authority certificate of your identity # # provider. It’s not needed if your identity provider’s certificate was issued by a well-known public CA. # # However, if deployCloudConsoleProxy is true, then this value must be provided, even for a well-known public # # CA. # certificateAuthorityData: # Node access configuration; uncomment this section if you wish to use a non-root user # with passwordless sudo capability for machine login. # nodeAccess: # loginUser: Node pools for worker nodes apiVersion: baremetal.cluster.gke.io/v1 kind: NodePool metadata: name: node-pool-1 namespace: cluster-STD-C01 spec: clusterName: STD-C01 nodes: address: 10.200.0.5 address: 10.200.0.6 |
第五步:透過bmctl進行正式部署,接下來只要等kubeconfig產出後,就可以登入叢集中使用囉!
| bmctl create cluster -c STD-C01 export KUBECONFIG=~/bmctl-workspace/STD-C01/STD-C01-kubeconfig |
第六步:創建service accout & role 並進行綁定,接下來只要取得token輸入到GCP Console > Anthos > 點選STD-C01 > login > token auth 中,我們就可以透過 GCP Console 來進行地端的K8S叢集管理囉。
| kubectl create serviceaccount gke-connect-admin kubectl create clusterrolebinding gke-connect-admin-clusterrolebinding –clusterrole cluster-admin –serviceaccount=default:gke-connect-admin kubectl get secrets NAME TYPE DATA AGE default-token-pkhk5 kubernetes.io/service-account-token 3 15h gke-connect-admin-token-pdns6 kubernetes.io/service-account-token 3 14h echo Token: $(kubectl get secret –namespace default gke-connect-admin-token-pdns6 -o jsonpath=”{.data.token}” | base64 –decode) Token: eyJhbGciOiJSUzI1NiIsImtpZCI6IlJfTzFqODdUVFByN2lidzhQMGc5djdTaDJYWlNTcU1sQUtiODU1TXltemcifQ.eyJpc3MiOiJrdWJlcm5ldGVzL3NlcnZpY2VhY2NvdW50Iiwia3ViZXJuZXRlcy5pby9zZXJ2aWNlYWNjb3VudC9uYW1lc3BhY2UiOiJkZWZhdWx0Iiwia3ViZXJuZXRlcy5pby9zZXJ2aWNlYWNjb3VudC9zZWNyZXQubmFtZSI6ImdrZS1jb25uZWN0LWFkbWluLXRva2VuLXBkbnM2Iiwia3ViZXJuZXRlcy5pby9zZXJ2aWNlYWNjb3VudC9zZXJ2aWNlLWFjY291bnQubmFtZSI6ImdrZS1jb25uZWN0LWFkbWluIiwia3ViZXJuZXRlcy5pby9zZXJ2aWNlYWNjb3VudC9zxxxxxxxxxxxxxxxxxxxxxxxxWlkIjoiMmJmMjcxYzUtMjc2ZC00MjRjLWExODUtNWM3NjJiZWI0Y2Q3Iiwic3ViIjoic3lzdGVtOnNlcnZpY2VhY2NvdW50OmRlZmF1bHQ6Z2tlLWNvbm5lY3QtYWRtaW4ifQ.l8a6hOLPDsl5LYP5aZrBAlaik8eCJFAYGmU0xr81BizgJ0ASb4YiCGSOKzgLGfZ8xq2OGDtrjTD3BG6DnZyKsnPihg1xYVnitZSVcXhQneGwQeFBXqRg81Wp6qfVqdJDB1Kr9dMZUzg0zVD9mOt9VNZhrMnAVTI5KO1KZBC4yBDwX2QLO5dHYdvg-RRsZZEK0SUt7Bu1rXoAWuMlwKRmaczGW3lAJkI87OT0H9xtL0_wc2UhQEkQl-P5e08MshKjSEcgdqOcLkZQxUsny7IsoIKQ6QT0XGOjWNNkc0kOcwrHAsxyna1tPRvTy7EvLicJ3ywcGWBFzQ63hs2zpSC-5w |
安裝kubenetes環境,原來可以如此的簡單!你是不是也是試試看呢!
從部署的過程中,我們會發現 Anthos on Bare Metal 已經將很多複雜的部署流程都進行了簡化,甚至連啟用GCP的API跟創建IAM權限,也都自動化了!除此之外在bmctl的部署工具中,也加入了部署檢測機制(preflight check),讓我們在建置的過程中,可以有較清晰的脈絡,知道哪些部分需要做調整跟修正。
針對一些核心的專案,也都陸續的整併到Anthos feature的生態系中了,,您只需要進行一些簡單的設置,就可以完成自動化的部署!這真的太棒了!而且遇到技術問題時,也可以開Case請Google的專家們來協助您解決問題、給予方向,讓您可以更快速的找到正確、對的方向,來進行問題處理、改進。
今天的內容差不多到這邊囉!後續我們還會再介紹Anthos的其他部署方式,敬請期待,也歡迎大家關注我們的活動網頁、Line頻道,就可以在第一時間獲得我們的最新更新囉!
發佈日期: 2021-09-13 | James Wu
更多雲地混合解決方案 : 雲地混合規劃與建置